Note
This article was automatically translated using Google
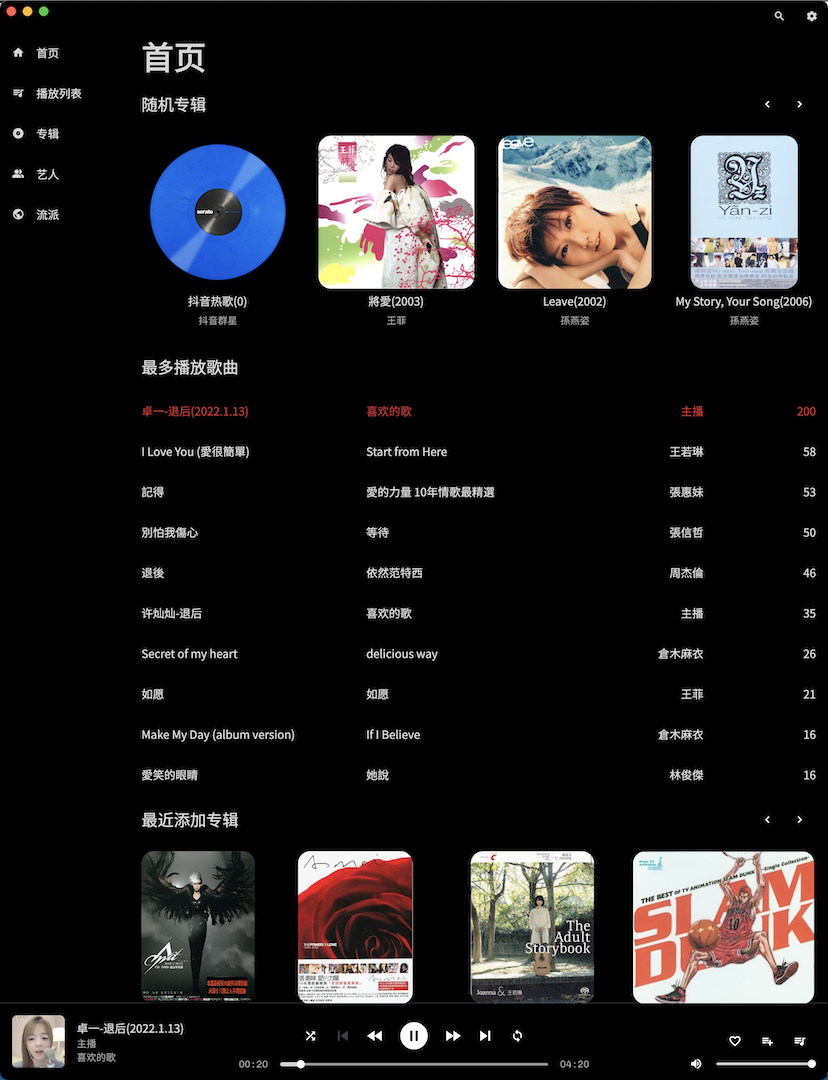
Today I finished the long-awaited homepage, including three: random albums, most played songs list, and recently added albums
In fact, the biggest difference between this APP and Netease Cloud is that you collect and listen to these songs yourself, so those recommended algorithms are not needed
CustomScrollView
The most troublesome thing about the homepage is the mixed arrangement of horizontal and vertical lists, but it is not very complicated. The main thing is that you must remember to set a fixed height and width, or the maximum width and maximum height, otherwise it is very easy to report an error
The first is Sliver, which makes people love and hate. The built-in animation saves a lot of things, but because of these automatic functions, only a small number of controls support it as its child. But fortunately, the official gave a SliverToBoxAdapter component, so that components that are not his child can be layered, which is very nice
The layout is a horizontal scrolling list of 10 random albums, below is a vertical list of the 10 most played songs, and below that is the most recently added horizontal 10 albums, maybe changing the most played songs to 5 looks better?

The implementation is also relatively simple. In addition to the pro-son SliverList control, for example, the title part needs to be set with SliverToBoxAdapter, just look at the code
Because I want to be compatible with the desktop, the desktop can slide left and right except Apple’s Magic Mouse, the general mouse does not have this function, so I need to add a button that slides left and right to click on the desktop
1 | return CustomScrollView( |
This is the content in the homepage build, and then MySliverControlBar is very simple, it is a Row set a Row layout
MySliverControlList is actually a horizontal ListView
Note here that if there is no need for the desktop side, that is, if you don’t need to manually control the scrolling, you don’t need to write a controller, but if I need to control the scrolling, I need to inject a controller. The control method is relatively simple, just click the button to trigger
1 | controller.animateTo(controller.offset - _size.width / 2, |
Offset is the displacement, atmospheric point, click once to move half the screen directly, the saved point will not be driven for half a day
In this way, the homepage is finished, and if you want to add any content to it later, it will be done in minutes, so let’s leave it at that.
In addition, the layout was adjusted again today, and the following control part was completely taken into bottomNavigationBar, so that the layout looks much simpler, and there may be another adjustment later, which is the middle part. Directly embed LeftScreen into each page, so that I can use flutter’s overall routing, and I can remove a global variable that controls routing
The most important thing is to make another judgment. If it is on the desktop, it will display LeftScreen. If it is on the mobile terminal, add navigation directly in bottomNavigationBar, so that the side-sliding button on the top left of the mobile terminal It can be removed. The left side is free to leave a place for Windows. When the client is Windows, the search and setting buttons can be pasted to the left, because the zoom in and out of Windows and the fork are on the right. I removed it for the sake of looking good. The title bar, so it can’t block the fork
Using MediaQuery causes the soft keyboard to not pop up
Mobile solution
This is a problem encountered during multi-terminal development, because Scaffold will adapt to different window sizes according to different devices, and the method to dynamically get the window size is *MediaQuery.of(context).size *, this is very convenient when developing on the desktop, but there will be problems when the keyboard pops up on the mobile phone
If the height of your panel is defined by size, but the soft keyboard pops up, the height of sliding up the form is also calculated by this, so after sliding up, your panel pushes down the position of the keyboard, which will cause the soft keyboard Frequent flashing will not keep the pop-up state, and the page keeps refreshing
If you want to do forced positioning, the best way is to use window.physicalSize, because the size of the form on the mobile terminal will not change, and then in order to do multi-terminal adaptation, the final width used should be: window .physicalSize.width / window.devicePixelRatio, and add resizeToAvoidBottomInset: false in Scaffold to avoid errors caused by small displacements
Desktop solution
After the mobile terminal is set up, there will be such a problem on the desktop terminal, window.physicalSize is called once. However, the desktop side can be dragged to zoom in and out. If we continue to use window.physicalSize on the desktop side, the panel will still be at the original height when zooming in and out. At this time, we want it to make dynamic adjustments , there are two ways to do it, one is to add a window listener to reacquire window.physicalSize when the size of the window changes, and the easiest way is to continue to use window.physicalSize, But put it in a global variable
1 | ValueNotifier<double> windowsWidth = |
Then when the outermost layer is built, it is outside Saffold, just right where MediaQuery.of(context).size can be obtained to make a value change, and then there is no need to do Value in other places Listening, because flutter will automatically rebuild saffold when the window changes. At this time, the change of these two values will be triggered first, and then the latter will be rendered. When rendering, the new value will naturally be taken, no need Do the monitoring again, if you can be a little lazy, just be a little lazy, the value monitoring needs to be set up again, all kinds of nesting dolls are too uncomfortable to watch
1 | //Use this to dynamically monitor form changes when it is not a mobile terminal |
In this way, the adaptation of the mobile terminal and the desktop terminal can be completed with the least code
The matte effect being played
Originally, I wanted to be “rule” and split the top and bottom into AppBar and bottomSheet, but I changed my mind when writing the playing page, because when making the bottom pop-up window, I hope that a full-screen page will pop up directly, instead of being stuck between AppBar and bottomSheet, so that even if the effect of frosted glass is done, it looks…actually pretty good, but um , I have OCD…

This kind of pop-up window that is playing feels…not good-looking, so I still continue my violent thinking, directly write the top and bottom into my own control to achieve a full-screen effect, and at the same time, I can rearrange the playback control on the pop-up page button, so put more buttons on it for movement.
The setting here is BoxDecoration(color: Colors.black.withOpacity(0.7)), I think it can actually be set to about 0.8
The implementation method is to use Stack to cover a layer, see the code
1 | Stack( |

Lyrics
The implementation of the lyrics uses the only and very good third-party component flutter_lyric: ^2.0.4+6 on the pub. It is not difficult to implement. The author wrote a demo and put it online. You can download the example in the source code and look at it accordingly. The lyrics themselves are “drawn”, so they are quite stable. Since my playback control and progress bar are obtained with StreamBuilder, I need to define There are a lot less things in the author’s example
1 | var lyricModel = |
Then add two lines in initState
1 | lyricUI.highlight = true; //Set highlight |
Then build the Widget of the lyrics reading UI and put it in the desired position
1 | Widget _buildReaderWidget() { |
At this point, the lyrics problem is solved, and it is enough to pass in different normalLyric later. You need to be careful not to run into the value monitoring of the progress bar, otherwise the lyrics will keep flashing if you keep running
It’s just that there is a problem with the current control. When you drag the lyrics to a certain sentence, you can indeed locate the desired position by clicking OK, but the scrolling of the lyrics will be stuck. I think the same is true in the author’s demo, so I raised an issue to the author, let’s see how to solve it later

Then the key thing is… how to find lyrics in batches… maybe I have to use Netease Cloud’s api…
